![]()
본 포스팅 내용은 과거에 개인적으로 공부할때 정리했던 ReactJS의 내용을 복습의 목적으로 다시 정리하는 포스팅입니다.
Fetch API는 Request나 Response와 같은 HTTP Pipeline에 접근 및 조작을 하기 위한 JavaScript interface를 제공한다.
Network를 통해 비동기방식으로 resource를 fetch하기 위해서 사용된다고 이해하면 된다.
사용방법은 아래와 같이 fetch() method에 자원을 얻기 위한 path를 넣어주고 request, response에 접근하면 된다.
1 | // fetch의 기본적인 사용 |
Request object
1 | // Request object |
Response object
아래와같이 Response 객체를 통해서 서버로부터 넘겨받은 데이터를 여러 형식으로 받아 올 수 있다.
response.json(): Parse the response as JSON
response.text(): Read the response and return as text
response.formData(): Return the response as FormData object
response.blob(): Return the response as Blob
response.arrayBuffer(): Return the response as ArrayBuffer
Axios는 native JavaScript API가 아니기 때문에 사용하려면 우선 npm i axios를 통해 Axios를 설치해줘야 한다. Axios는 JavaScript library로, node.js 또는 XMLHttpRequests로부터 http requests 만들때 사용이 된다.
그럼 Fetch() method와 비교했을때 Axios library는 어떤 장점이 있을까?
첫번재, Fetch() method에서는 사용할때마다 매번 인자로 resource를 가져올 path를 넣어줘야 하는데, Axios는 baseURL과 기타 설정 부분을 공통처리해서 만든 instance 객체로 재사용해서 사용이 가능하다는 점이다.
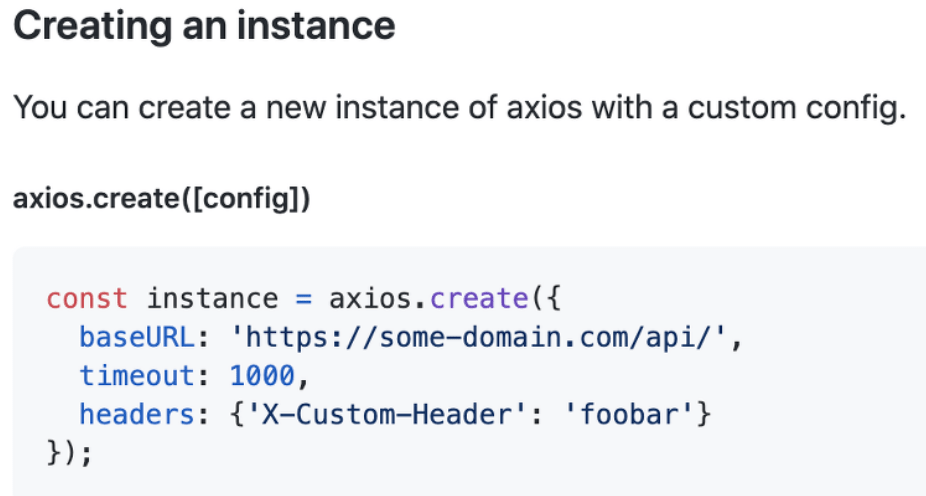
1 | import axios from 'axios'; |
두번째, Axios는 download progress를 관리할 수 있는 build-in function이 있다.
세번째, Axios는 XSRF에 대항하여 client-side 보호가 가능하다.
XSRF?
사이트 간 요청 위조(또는 크로스 사이트 요청 위조, Cross-site request forgery, CSRF, XSRF)라고 한다. 웹 사이트 취약점 공격들 중에 하나로, 사용자가 자신의 의지와는 무관하게 공격자가 의도한 행위(수정, 삭제, 등록)를 특정 웹 사이트에 요청하게 하는 공격을 말한다.
Reference website : XSRF-wikipedia
네번째, 자동으로 request와 response를 변환해준다.
아래의 예시에서 볼 수 있듯이, data를 JSON으로 자동 convert해주고, 이것을 request body로써 전송해준다.
1 | // send a POST request |
다섯번째 Axios는 각기 다른 HTTP requests를 위한 shorthand methods를 제공한다.
- axios.request(config)
- axios.get(url[, config])
- axios.delete(url[, config])
- axios.head(url[, config])
- axios.options(url[, config])
- axios.post(url[, data[, config]])
- axios.put(url[, data[, config]])
- axios.patch(url[, data[, config]])
예를들어, post방식으로 /login 에 입력받은 firstName과 lastname을 request body에 담아 보내고자 한다면 아래와 같이 간단하게 작성해 줄 수 있다.
1 | axios |
axios.post는 아래의 response 정보를 반환해준다.
1 | // `data` is the response that was provided by the server |